(Before and After of my entire bathroom redo found here.)
UPDATE: It's been almost nine months since I painted this faucet, and I'm delighted to say that it has held up beautifully, even with our hard water. There are a couple tiny chips on the drain assembly, but that would be my husband's fault for prying it up with his fingernails when it got stuck once! The faucet itself has not a scratch.
Replacing a faucet is EXPENSIVE. And you want to make sure you get a good one...and THAT's what made me decide I'd try the paint route.
I've seen people who have painted their faucets with some success. The biggest turn off for me (other than durability concerns) was all the precise taping.
I hate taping.
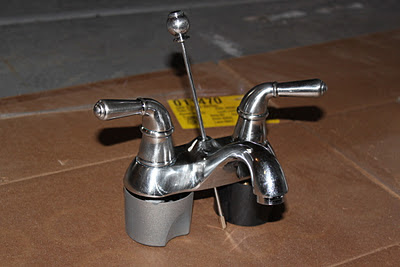
So I decided just to take out my faucet and drain assembly and spray paint them in the garage! Thank you, YouTube.
It's a pick your poison kind of situation. It definitely took me just as long to remove the faucet and drain assembly as it would have to tape. But I just felt I could do a better paint job with the faucet off.
Once I had removed the faucet, I scraped off all the old caulk and cleaned it thoroughly.
Then I put on some gloves and started scuffing it up with some steel wool. Unfortunately, the steel wool I had was super fine, so it wasn't doing the best job. So instead I grabbed a Scotch-Brite heavy duty sponge and used that. It did a lovely job of scuffing it up.
Then I put on some gloves and started scuffing it up with some steel wool. Unfortunately, the steel wool I had was super fine, so it wasn't doing the best job. So instead I grabbed a Scotch-Brite heavy duty sponge and used that. It did a lovely job of scuffing it up.
And then, I started spraying. With primer. I used some Rustoleum I had lying around from when I did our custom house numbers. REMEMBER, folks, lots of thin coats.
Next, the oil rubbed bronze spray paint. Krylon Brushed Metallic.
Then I used some of the leftover Sophisticated Finishes copper metallic surfacer from my lamp redo to add some copper highlights. I used a make-up sponge, and just lightly whisked it over the areas I wanted to highlight.
And the topcoat! I used Krylon Matte Finish. Again, lots of THIN coats. Lots. I was aiming for the most durability possible.
And then it was time to put it back in.
My biggest concern with durability was cleaning it. I don't know if it could hold up to being scrubbed. So my solution is to prevent the problem before it starts. I wipe the faucet and drain assembly down with a Clorox wipe every night. So far, so good!
I love it! And for less than 10 bucks, I'm happy!!!
I love it! And for less than 10 bucks, I'm happy!!!
Linking up here:
{M} Ask Anna-Skip to My Lou-The DIY Showoff-Mad in Crafts-Marvelously Messy-Pinkopotamus-The Girl Creative-Sumo's Sweet Stuff-Making the World Cuter-Sew Can Do- C.R.A.F.T.- Keeping It Simple-Mo Momma-Creating My Way to Success-All Things Fee-Etcetorize -Craft-o-Maniac-My Junk Drawer-Homemaker in Heels-Singing Three Little Birds-The House in the Roses-Boogieboard Cottage-Be Colorful-Between Naps on the Porch-I Should Be Mopping the Floor {T} Creating a House of Grace-Today's Creative Blog-Tip Junkie-Cherished Bliss-A Diamond in the Stuff-Sugar Bee Crafts-Vintage Wanna Bee-Reasons to Skip the Housework-The Kurtz Corner-Me and My Boys-Embellishing Life-All Thingz Related-Funky Polkadot Giraffe-Hope Studios-Creative Itch-Not Just a Housewife-Rook No. 17-At Home with K-My Uncommon Slice of Suburbia-Home Stories A2Z-Type A Decorating-DIY by Design-Primitive and Proper {furniture only}-Elizabeth & Co.-Project Queen-Coastal Charm-Ladybug Blessings-Homework-Topsy Turvy-New Nostalgia-Measured by the Heart {W} Tea Rose Home-Someday Crafts-Lil' Luna-Creations by Kara-Sew Woodsy -Goodbye City Hello Suburbs-Blue Cricket Design-Sew Much Ado-My Girlish Whims -A Mommy's Life with a touch of yellow-Very Merry Vintage Style-Savvy Southern Style-Seven Thirty Three-Night Owl Crafting-Sugar and Dots-The Trendy Treehouse-Southern Lovely -Polkadots on Parade-Restore Interiors-Chatty Chicks-Ginger Snap Crafts-The Sasse Life-Fireflies and Jellybeans-Organize and Decorate Everything {Th} The Shabby Creek Cottage-House of Hepworths-The Brambleberry Cottage-The 36th Avenue-Yesterday on Tuesday-Saved by Love Creations-Momnivore's Dilemma-Beyond the Picket Fence-Somewhat Simple-Gluesticks-A Glimpse Inside-Domestically Speaking {paint only}-A Creative Princess-Christina's Adventures {$20}-What Allie's Making Now-Tales from Bloggeritaville-A Little Knick Knack-Crafty, Scrappy, Happy {F} Thirty Handmade Days-Just a Girl-Romantic Home-Remodelaholic-Shabby Nest-Young & Crafty-Lovely Crafty Home-WhipperBerry-At the Picket Fence-Finding Fabulous-delicate CONSTRUCTION-My Repurposed Life-Naptime Crafters-Chic on a Shoestring Budget Decorating-Fingerprints on the Fridge-504 Main-Cookie Nut Creations-Making Lemonade-French Country Cottage-The Crafty Nest-Sassy Sites {S} Funky Junk Interior-Ladybird Lane-Tatertots and Jello-Craft Envy-A Law Student's Journey


