Home     About Me     Features     Fave Places to Party!
Crafting      Home Improvement & Decor     Digital Scrapping     Reading
Showing posts with label bathroom. Show all posts

Saturday, February 4, 2012

And the miscellaneous bits about my bathroom redo...

(Before and After of my entire bathroom redo found here.)
Just tying up loose ends.
I took down all the plain old nickel hardware (light fixture, towel ring, towel bar, TP holder, toilet flush handle, robe hook, shower curtain rod and rings) and painted it with some more Krylon oil rubbed bronze, and added the copper highlights just like I did with the faucet.  Everything is holding up perfectly so far...except the shower curtain rings.  They WERE plastic rather than metal like everything else, and the inside of the rings where they rub the rod are chipping.  If I was smart, I would have somehow put some clear tape on the inside of the rings...but I guess I'm not!  :)
My Eastern Europe photos were edited using the Pioneer Woman photo action Seventies.  The frames are just 8X8 frames I spray painted white.
The hand towels and bath towel are from IKEA, shower curtain from Amazon.  Tumbler is plastic, they were two for $0.84 at Walmart...my kids broke the glass tumbler I had, and I'd prefer for that not to happen again!  Soap dispenser I got at Robert's Crafts (before they closed all their stores to sell online only).

Thursday, February 2, 2012

Framing a Mirror

(Before and After of my entire bathroom redo found here.)
Framing the mirror was not all that difficult.  First, I measured around the mirror.  Next, I hammered door shims into the wall around the mirror so that there was a level surface to attach the molding.
Yep, I'm in my jammies...I do some of my best work in my jammies....  ;)
Then, I measured the molding and cut the appropriate 45 degree angles with a miter saw, then stained and polyurethaned.
Now, like a lot of ugly old builder grade mirrors, ours was attached to the wall with brackets, which meant the molding wouldn't sit completely flush against the mirror.  So I figured out where the brackets would be against the back side of the molding (using the highly technical method of holding the molding in place, then lifting the edge and trying to peer in there while also sticking a marker in there to mark the edges), and drilled a few holes (NOT ALL THE WAY THROUGH, BE CAREFUL!)
and finished it off with a utility knife.
So then, the molding fit nice and flat against the mirror.  With some construction adhesive (careful here, folks, not to much or it will come oozing out under the edges)
and a few well-placed wire brads, the molding was in place.
Next, wood filler in the corners and the nail holes.
Let it dry, then dab on some stain with a Q tip.  Wait for that to dry, and see how it looks, then top 'er off with a little poly (NOT with a Q tip this time!).
And VoilĂ !!!  C'est magnifique!
 And much cheaper than buying a big ole framed mirror! :)


Linking up here:
{M} Ask Anna-Skip to My Lou-The DIY Showoff-Mad in Crafts-Marvelously Messy-Pinkopotamus-The Girl Creative-Sumo's Sweet Stuff-Making the World Cuter-Sew Can DoC.R.A.F.T.- Keeping It Simple-Mo Momma-Creating My Way to Success-All Things Fee-Etcetorize -Craft-o-Maniac-My Junk Drawer-Homemaker in Heels-Singing Three Little Birds-The House in the Roses-Boogieboard Cottage-Be Colorful-Between Naps on the Porch-I Should Be Mopping the Floor {T} Creating a House of Grace-Today's Creative Blog-Tip Junkie-Cherished Bliss-A Diamond in the Stuff-Sugar Bee Crafts-Vintage Wanna Bee-Reasons to Skip the Housework-The Kurtz Corner-Me and My Boys-Embellishing Life-All Thingz Related-Funky Polkadot Giraffe-Hope Studios-Creative Itch-Not Just a Housewife-Rook No. 17-At Home with K-My Uncommon Slice of Suburbia-Home Stories A2Z-Type A Decorating-DIY by Design-Primitive and Proper {furniture only}-Elizabeth & Co.-Project Queen-Coastal Charm-Ladybug Blessings-Homework-Topsy Turvy-New Nostalgia-Measured by the Heart {W} Tea Rose Home-Someday Crafts-Lil' Luna-Creations by Kara-Sew Woodsy -Goodbye City Hello Suburbs-Blue Cricket Design-Sew Much Ado-My Girlish Whims -A Mommy's Life with a touch  of yellow-Very Merry Vintage Style-Savvy Southern Style-Seven Thirty Three-Night Owl Crafting-Sugar and Dots-The Trendy Treehouse-Southern Lovely -Polkadots on Parade-Restore Interiors-Chatty Chicks-Ginger Snap Crafts-The Sasse Life-Fireflies and Jellybeans-Organize and Decorate Everything {Th} The Shabby Creek Cottage-House of Hepworths-The Brambleberry Cottage-The 36th Avenue-Yesterday on Tuesday-Saved by Love Creations-Momnivore's Dilemma-Beyond the Picket Fence-Somewhat Simple-Gluesticks-A Glimpse Inside-Domestically Speaking {paint only}-A Creative Princess-Christina's Adventures {$20}-What Allie's Making Now-Tales from Bloggeritaville-A Little Knick Knack-Crafty, Scrappy, Happy-Two Yellow Birds Decor {F} Thirty Handmade Days-Just a Girl-Romantic Home-Remodelaholic-Shabby Nest-Young & Crafty-Lovely Crafty Home-WhipperBerry-At the Picket Fence-Finding Fabulous-delicate CONSTRUCTION-My Repurposed Life-Naptime Crafters-Chic on a Shoestring Budget Decorating-Fingerprints on the Fridge-504 Main-Cookie Nut Creations-Making Lemonade-French Country Cottage-The Crafty Nest-Sassy Sites-Kojo Designs-It's a Hodgepodge Life-Tidy Mom-Truly Lovely-Simply Designing-Bubbly Nature Creations-Home is Where My Story Begins-Miss Mustard Seed {furniture only}-Simply Sweet Home-Creation Corner-Joyful Stamper-Craftionary-Release Me Create-Simple Home Life-Family Ever After-Addicted to Decorating {S} Funky Junk Interior-Ladybird Lane-Tatertots and Jello-Craft Envy-A Law Student's Journey

Friday, January 27, 2012

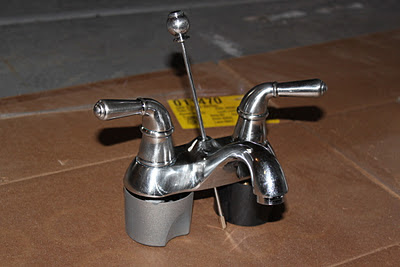
Painting the bathroom faucet

(Before and After of my entire bathroom redo found here.)
UPDATE: It's  been almost nine months since I painted this faucet, and I'm delighted to say that it has held up beautifully, even with our hard water.  There are a couple tiny chips on the drain assembly, but that would be my husband's fault for prying it up with his fingernails when it got stuck once!  The faucet itself has not a scratch.

Replacing a faucet is EXPENSIVE.  And you want to make sure you get a good one...and THAT's what made me decide I'd try the paint route.
I've seen people who have painted their faucets with some success.  The biggest turn off for me (other than durability concerns) was all the precise taping.
I hate taping.
So I decided just to take out my faucet and drain assembly and spray paint them in the garage!  Thank you, YouTube.
It's a pick your poison kind of situation.  It definitely took me just as long to remove the faucet and drain assembly as it would have to tape.  But I just felt I could do a better paint job with the faucet off.
Once I had removed the faucet, I scraped off all the old caulk and cleaned it thoroughly.
Then I put on some gloves and started scuffing it up with some steel wool.  Unfortunately, the steel wool I had was super fine, so it wasn't doing the best job.  So instead I grabbed a Scotch-Brite heavy duty sponge and used that.  It did a lovely job of scuffing it up.
And then, I started spraying.  With primer.  I used some Rustoleum I had lying around from when I did our custom house numbers.  REMEMBER, folks, lots of thin coats.
Next, the oil rubbed bronze spray paint.  Krylon Brushed Metallic
Then I used some of the leftover Sophisticated Finishes copper metallic surfacer from my lamp redo to add some copper highlights.  I used a make-up sponge, and just lightly whisked it over the areas I wanted to highlight.
And the topcoat!  I used Krylon Matte Finish.  Again, lots of THIN coats.  Lots. I was aiming for the most durability possible.
And then it was time to put it back in.
My biggest concern with durability was cleaning it.  I don't know if it could hold up to being scrubbed.  So my solution is to prevent the problem before it starts.  I wipe the faucet and drain assembly down with a Clorox wipe every night.  So far, so good!
I love it!  And for less than 10 bucks, I'm happy!!!


Linking up here:
{M} Ask Anna-Skip to My Lou-The DIY Showoff-Mad in Crafts-Marvelously Messy-Pinkopotamus-The Girl Creative-Sumo's Sweet Stuff-Making the World Cuter-Sew Can DoC.R.A.F.T.- Keeping It Simple-Mo Momma-Creating My Way to Success-All Things Fee-Etcetorize -Craft-o-Maniac-My Junk Drawer-Homemaker in Heels-Singing Three Little Birds-The House in the Roses-Boogieboard Cottage-Be Colorful-Between Naps on the Porch-I Should Be Mopping the Floor {T} Creating a House of Grace-Today's Creative Blog-Tip Junkie-Cherished Bliss-A Diamond in the Stuff-Sugar Bee Crafts-Vintage Wanna Bee-Reasons to Skip the Housework-The Kurtz Corner-Me and My Boys-Embellishing Life-All Thingz Related-Funky Polkadot Giraffe-Hope Studios-Creative Itch-Not Just a Housewife-Rook No. 17-At Home with K-My Uncommon Slice of Suburbia-Home Stories A2Z-Type A Decorating-DIY by Design-Primitive and Proper {furniture only}-Elizabeth & Co.-Project Queen-Coastal Charm-Ladybug Blessings-Homework-Topsy Turvy-New Nostalgia-Measured by the Heart {W} Tea Rose Home-Someday Crafts-Lil' Luna-Creations by Kara-Sew Woodsy -Goodbye City Hello Suburbs-Blue Cricket Design-Sew Much Ado-My Girlish Whims -A Mommy's Life with a touch  of yellow-Very Merry Vintage Style-Savvy Southern Style-Seven Thirty Three-Night Owl Crafting-Sugar and Dots-The Trendy Treehouse-Southern Lovely -Polkadots on Parade-Restore Interiors-Chatty Chicks-Ginger Snap Crafts-The Sasse Life-Fireflies and Jellybeans-Organize and Decorate Everything {Th} The Shabby Creek Cottage-House of Hepworths-The Brambleberry Cottage-The 36th Avenue-Yesterday on Tuesday-Saved by Love Creations-Momnivore's Dilemma-Beyond the Picket Fence-Somewhat Simple-Gluesticks-A Glimpse Inside-Domestically Speaking {paint only}-A Creative Princess-Christina's Adventures {$20}-What Allie's Making Now-Tales from Bloggeritaville-A Little Knick Knack-Crafty, Scrappy, Happy  {F} Thirty Handmade Days-Just a Girl-Romantic Home-Remodelaholic-Shabby Nest-Young & Crafty-Lovely Crafty Home-WhipperBerry-At the Picket Fence-Finding Fabulous-delicate CONSTRUCTION-My Repurposed Life-Naptime Crafters-Chic on a Shoestring Budget Decorating-Fingerprints on the Fridge-504 Main-Cookie Nut Creations-Making Lemonade-French Country Cottage-The Crafty Nest-Sassy Sites {S} Funky Junk Interior-Ladybird Lane-Tatertots and Jello-Craft Envy-A Law Student's Journey

Sunday, January 22, 2012

Bathroom Redo

I'm so excited to show y'all the VAST improvement of my main bathroom!
Let's get to it!
Before:
Yes, that is me in the my bathrobe with my needy daughter clinging to my legs...
After:
 
 
(I have separate posts for how to paint the faucet, how to frame the mirror, and the miscellaneous tidbits of the redo)
I took down all the hardware, the light fixture, and the shower curtain rod & rings, painted them oil-rubbed bronze and added copper highlights.  I uninstalled the faucet and drain assembly and painted that as well (and used about a million layers of top coat).  I added a beautiful frame to the plain old mirror.  I got new towels (thank you IKEA) and shower curtain, framed some 8X8 prints from my time in Eastern Europe, and, OF COURSE, painted and stenciled.


A little while ago, Cutting Edge Stencils contacted me to see if I would be interested in doing a product review and a GIVEAWAY.  Um, YES!!!  I'd been thinking of redoing that bathroom, and stenciling had crossed my mind, so this offer just sealed the deal!  After browsing all their beautiful stencils, I settled on their Paisley Allover stencil.  I kinda have a bit of a love affair with paisley.  And when I saw that GORGEOUS stencil, I couldn't resist.

Now, I did choose one of the trickiest stencils, and definitely one of the trickiest walls (I had to stencil around the shower insert, the toilet, the cabinet, the mirror, the lighting wires and mounting screw...).  But the stencil came with very clear illustrated instructions, and Cutting Edge has some terrific video tutorials:

I felt more than prepared to tackle my project!  I had it done in less than a day, and I'm thrilled with how it turned out.  Stunning, right?  :)

Giveaway closed

Linking up here:
{M} Ask Anna-Skip to My Lou-The DIY Showoff-Mad in Crafts-Marvelously Messy-Pinkopotamus-The Girl Creative-Sumo's Sweet Stuff-Making the World Cuter-Sew Can DoC.R.A.F.T.- Keeping It Simple-Mo Momma-Creating My Way to Success-All Things Fee-Etcetorize -Craft-o-Maniac-The Trendy Treehouse-My Junk Drawer-Homemaker in Heels-Singing Three Little Birds-The House in the Roses-Boogieboard Cottage-Be Colorful-Between Naps on the Porch {T} Creating a House of Grace-Today's Creative Blog-Tip Junkie-Cherished Bliss-A Diamond in the Stuff-Sugar Bee Crafts-Vintage Wanna Bee-Reasons to Skip the Housework-The Kurtz Corner-Me and My Boys-Embellishing Life-All Thingz Related {W} Tea Rose Home-Someday Crafts-Lil' Luna-Creations by Kara-Eisy Morgan-Bella Before and After-Sew Woodsy -Goodbye City Hello Suburbs-Blue Cricket Design-Sew Much Ado-My Girlish Whims -A Mommy's Life with a touch  of yellow {Th} The Shabby Creek Cottage-House of Hepworths-The Brambleberry Cottage-The 36th Avenue-Yesterday on Tuesday-Saved by Love Creations-Momnivore's Dilemma  {F} Thirty Handmade Days-Just a Girl-Romantic Home-Remodelaholic-Shabby Nest-Young & Crafty-Lovely Crafty Home-WhipperBerry-At the Picket Fence-Finding Fabulous-delicate CONSTRUCTION-My Repurposed Life-Naptime Crafters-Chic on a Shoestring Budget Decorating-A Little Knick Knack-Fingerprints on the Fridge -504 Main-Cookie Nut Creations-Making Lemonade-French Country Cottage-The Crafty Nest {S} Funky Junk Interior-Ladybird Lane-Tatertots and Jello-Craft Envy-A Law Student's Journey


Related Posts Plugin for WordPress, Blogger...